یک پروژه با نام dropdwnlist ایجاد نمایید سپس بعد از اضافه نمودن کنترلر Home کدهای زیر را به آن اضافه نمایید. سه کلاس Category و SubCategory و ViewModel را نیز به انتهای کنترلر اضافه نمایید .
تذکر : فایل Jquery به برنامه اضافه گردد.
public class HomeController : Controller
{
public ActionResult Index()
{
ViewModel vm = new ViewModel();
List<Category> categoty = new List<Category>();
categoty.Add(new Category() { CategoryName = "-Select-", CategoryId = 0 });
categoty.Add(new Category() { CategoryName = "Electronics", CategoryId = 1 });
categoty.Add(new Category() { CategoryName = "Accessories", CategoryId = 2 });
List<SubCategory> subCategoty = new List<SubCategory>();
subCategoty.Add(new SubCategory() { CategoryId = 0, SubCategoryName = "--Select--", SubCategoryId = 0 });
vm.categoty = categoty;
vm.subCategoty = subCategoty;
return View(vm);
}
public JsonResult GetSubCategory(int CategoryId)
{
string code = string.Empty;
StringBuilder sb = new StringBuilder();
foreach (var data in SubCategory(CategoryId))
{
sb.Append("<option value='" + data.SubCategoryId + "' >" + data.SubCategoryName + " </option> ");
}
return Json(sb.ToString(), JsonRequestBehavior.AllowGet);
}
public List<SubCategory> SubCategory(int CategoryId)
{
List<SubCategory> subCategory = new List<SubCategory>();
subCategory.Add(new SubCategory() { CategoryId = 1, SubCategoryName = "Laptop", SubCategoryId = 1 });
subCategory.Add(new SubCategory() { CategoryId = 1, SubCategoryName = "Desktop", SubCategoryId = 2 });
subCategory.Add(new SubCategory() { CategoryId = 1, SubCategoryName = "IPad", SubCategoryId = 3 });
subCategory.Add(new SubCategory() { CategoryId = 2, SubCategoryName = "Pendrive", SubCategoryId = 1 });
subCategory.Add(new SubCategory() { CategoryId = 2, SubCategoryName = "SD Card", SubCategoryId = 2 });
subCategory.Add(new SubCategory() { CategoryId = 2, SubCategoryName = "Pouch", SubCategoryId = 3 });
subCategory = subCategory.Where(a => a.CategoryId == CategoryId).ToList();
return subCategory;
}
}
//Temp DataClass
public class Category
{
public int CategoryId { get; set; }
public string CategoryName { get; set; }
}
//Temp Data Class
public class SubCategory
{
public int CategoryId { get; set; }
public int SubCategoryId { get; set; }
public string SubCategoryName { get; set; }
}
//ViewModel class Binding View
public class ViewModel
{
public List<Category> categoty { get; set; }
public List<SubCategory> subCategoty { get; set; }
کدهای زیر را در ویوی متناظر با اکشن Index درج نمایید.و سپس برنامه را اجرا نمایید.
@model dropdwnlist.Controllers.ViewModel
@{
ViewBag.Title = "Index";
}
@section featured {
<section class="featured">
</section>
}
<strong>Disabling SubCategory DropDown List</strong>
<table>
<tr>
<td>Category
</td>
<td>Sub Category
</td>
</tr>
<tr>
<td>
@(Html.DropDownListFor(m => m.categoty, new SelectList(Model.categoty, "CategoryId", "CategoryName"), new { @class = "CssCategory" }))
</td>
<td>
@(Html.DropDownListFor(m => m.subCategoty, new SelectList(Model.subCategoty, "SubCategoryId", "SubCategoryName"), new { @class = "CssSubcategory" }))
</td>
</tr>
</table>
<script src="~/Scripts/jquery-1.7.1.js"></script>
<script type="text/javascript">
$(document).ready(function () {
if ($('.CssCategory').val() == "0") {
$('.CssSubcategory').attr("disabled", "disabled");
}
$('.CssCategory').change(function () {
if ($(this).val() != "0") {
$('.CssSubcategory').removeAttr("disabled");
}
if ($(this).val() == "0") {
$('.CssSubcategory').html("<option>-Select-</option>");
$('.CssSubcategory').attr("disabled", "disabled");
return false;
}
var categoryId = $(this).val();
var URL = '@Url.Action("GetSubCategory")' + '?CategoryId=' + categoryId;
$.getJSON(URL, function (data) {
$('.CssSubcategory').html(data);
});
});
});
</script>
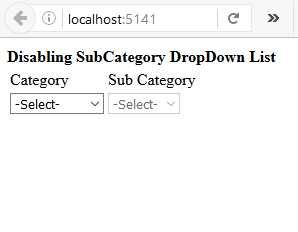
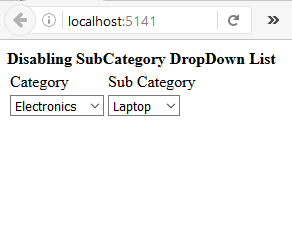
خروجی برنامه را باتوجه شکلهای زیر مشاهده کنید